Joker modification, Part III

(! Disclaimer ! I've started and stopped this post so many times, it may read like a 6-year old wrote it, with apologies to 6-year-olds everywhere. I'll fix it when I get time, so no Howlers please!
(Disclaimer #2 - 3/26/2012 - After losing all the blog pictures, I'm reconstructing this post, and all posts, again so if something seems out of sequence, it probably got juggled around. Sorry. Send me a note if something's missing or doesn't make sense.)
My next move on the Joker bike was to relocate the speedometer. So far, things have been relatively easy, but this modification involved a little more serious wiring, including cutting the wiring harness to the existing LED display lights and splicing the Joker Machine LED leads into it. It had to be right, and it had to be done neatly since all this is out there where everyone gets to see your work. It ain't like you can wrap a roll of black tape around it and walk away.
For the record, Joker says the necessary electrical work is straightforward. Maybe so, but if wiring isn't your area of expertise, it does require a little patience. I had to take my time.


Disconnect your battery before messing with the wiring.
Next step is to remove the speedometer. Take the two allen screws out of the backing plate, unplug the harness, unscrew the odometer reset button from the backing plate (just squeeze and twist), and pull the rubber retainer seal from around the base of the gauge. The speedo then comes right out. Click this for a YouTube video that shows the steps. The video suggests a different way of dealing with the LEDs, so if you're using the Joker mount, ignore that part, but it was helpful to me for getting my speedo apart. Beats the fuck out of saying "remove speedo" and having some poor bastard like me fumble through, breaking stuff.
Leave the speedo mount/top cap on for now.


Now I loosened the riser mounting bolts and then the 4 screws holding the top cap in place. Then.....deep breath now....I took a pair of wire cutters and cut the LED wiring bundle about 2" from the base of the top clamp, leaving a little something there in case I need to reinstall someday. Then the old risers came off and all the spare parts went into the parts bin. Open up another beer and take a break. (You are drinking beer, right?)

Burp!
OK, let's finish up this project. Next I installed the new risers, which is simple enough. I'll mention that I should have touched up the shiny bands on the bars with some flat black paint before mounting. The risers don't cover them up. Ask me how I know.
Don't fully tighten the riser mounting bolts until after you clamp the handlebars in place. Clamping the bars helps line the risers up, so tighten the top clamps first, and then finish tightening the riser bolts.


OK, stay tuned for the next installment. Air cleaner and whatever else I can find, but there's actually not much more I wanna do right now, figuring I'll get some riding out of the Joker before tearing it apart again.
Cowboy

(! Disclaimer ! I've started and stopped this post so many times, it may read like a 6-year old wrote it, with apologies to 6-year-olds everywhere. I'll fix it when I get time, so no Howlers please!
(Disclaimer #2 - 3/26/2012 - After losing all the blog pictures, I'm reconstructing this post, and all posts, again so if something seems out of sequence, it probably got juggled around. Sorry. Send me a note if something's missing or doesn't make sense.)
My next move on the Joker bike was to relocate the speedometer. So far, things have been relatively easy, but this modification involved a little more serious wiring, including cutting the wiring harness to the existing LED display lights and splicing the Joker Machine LED leads into it. It had to be right, and it had to be done neatly since all this is out there where everyone gets to see your work. It ain't like you can wrap a roll of black tape around it and walk away.
For the record, Joker says the necessary electrical work is straightforward. Maybe so, but if wiring isn't your area of expertise, it does require a little patience. I had to take my time.

I chose the Joker Machine hardware for relocation, mostly because the quality is outstanding, and I stick with stuff that's made well. This was no place to get thrifty. I was moving a critical component, also replacing the stock risers and clamp with custom hardware.


Joker speedo bracket comes in two colors; I chose black. Wiring, etc is all included, along with a black wire loom.

2" Joker risers; same as stock height.
From Joker, all this will set ya back about $370, or $225 for the mount and $145 for the risers. Get 'em from Phat Performance Parts for about 10% off plus free shipping. They ain't cheap, but they're nice, and if you happen to be a machinist, you'll appreciate the craftsmanship. Both are 6061-T6 Aluminum, black anodized.
I also didn't care much for the other choices to move the speedo. One available kit involved moving it between the cylinders on the left side of the engine, but I'd just moved the coil there, and that seemed like an awkward fucking place for a speedo. Another idea was using some combination of AutoZone parts, mounting it on the fork tube, which might have been OK, but the Joker kit was just a sweeter way to do the job.
Let's do it!
Get the bike in the air so you can remove the front wheel. The bike gets a little tail heavy when the front wheel comes off, so I tied my bike down to my Pitbull Lift with two straps at the lower bend of the frame downtubes, just to be on the safe side.
As mentioned in Nightster, Part II, the Pitbull Lift Turntable Attachment doesn't work well with a Sportster, or at least not this one. Wobbly as hell. I took the attachment off, and then the lift worked just fine with the Nightster. So Softail=Yes & Nightster=No on that Pitbull Turntable....Just sayin'.
The Joker speedometer mount slips over the left fork tube, between the upper and lower triple tree, so the tube needs to drop down a little below the top triple tree. (They're ain't no way out, so you gotta do it. I puckered just a little when I read that little tidbit, but it was really no big deal.)
Wheel removal and tube drop in this order:
- Remove brake caliper by removing 2 mounting bolts. Pull it over to the RH side of the bike and let it rest between the front exhaust pipe and the cylinder.
- Remove axle nut
- Remove pinch bolt on right side of axle, remembering that the socket head was in front with no washer.
- Pull out the axle, paying attention to where the wheel spacers are. The thicker one on mine was on the left side.
- I had to let the air out so the tire would squeeze between the fender mount bolts
- Then the fender came off, tucked safely out of the way in case I started throwing stuff. Didn't want to scratch up that new pin-striping with a flying wrench.
- Loosen the two left side clamp bolts on the triple trees and the left fork tube easily slides down
This allowed me to slide the mount over the fork tube. I then moved the tube back up into position and torqued the clamping bolts, but I left the fender and wheel off for now, out of my way. On the tree clamp bolts, and all bolts, I used Blue Loctite.


Tie it down!
Disconnect your battery before messing with the wiring.
Next step is to remove the speedometer. Take the two allen screws out of the backing plate, unplug the harness, unscrew the odometer reset button from the backing plate (just squeeze and twist), and pull the rubber retainer seal from around the base of the gauge. The speedo then comes right out. Click this for a YouTube video that shows the steps. The video suggests a different way of dealing with the LEDs, so if you're using the Joker mount, ignore that part, but it was helpful to me for getting my speedo apart. Beats the fuck out of saying "remove speedo" and having some poor bastard like me fumble through, breaking stuff.
Leave the speedo mount/top cap on for now.

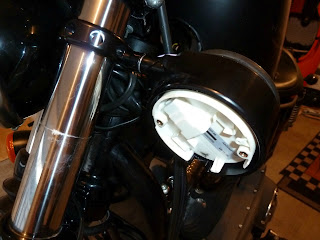
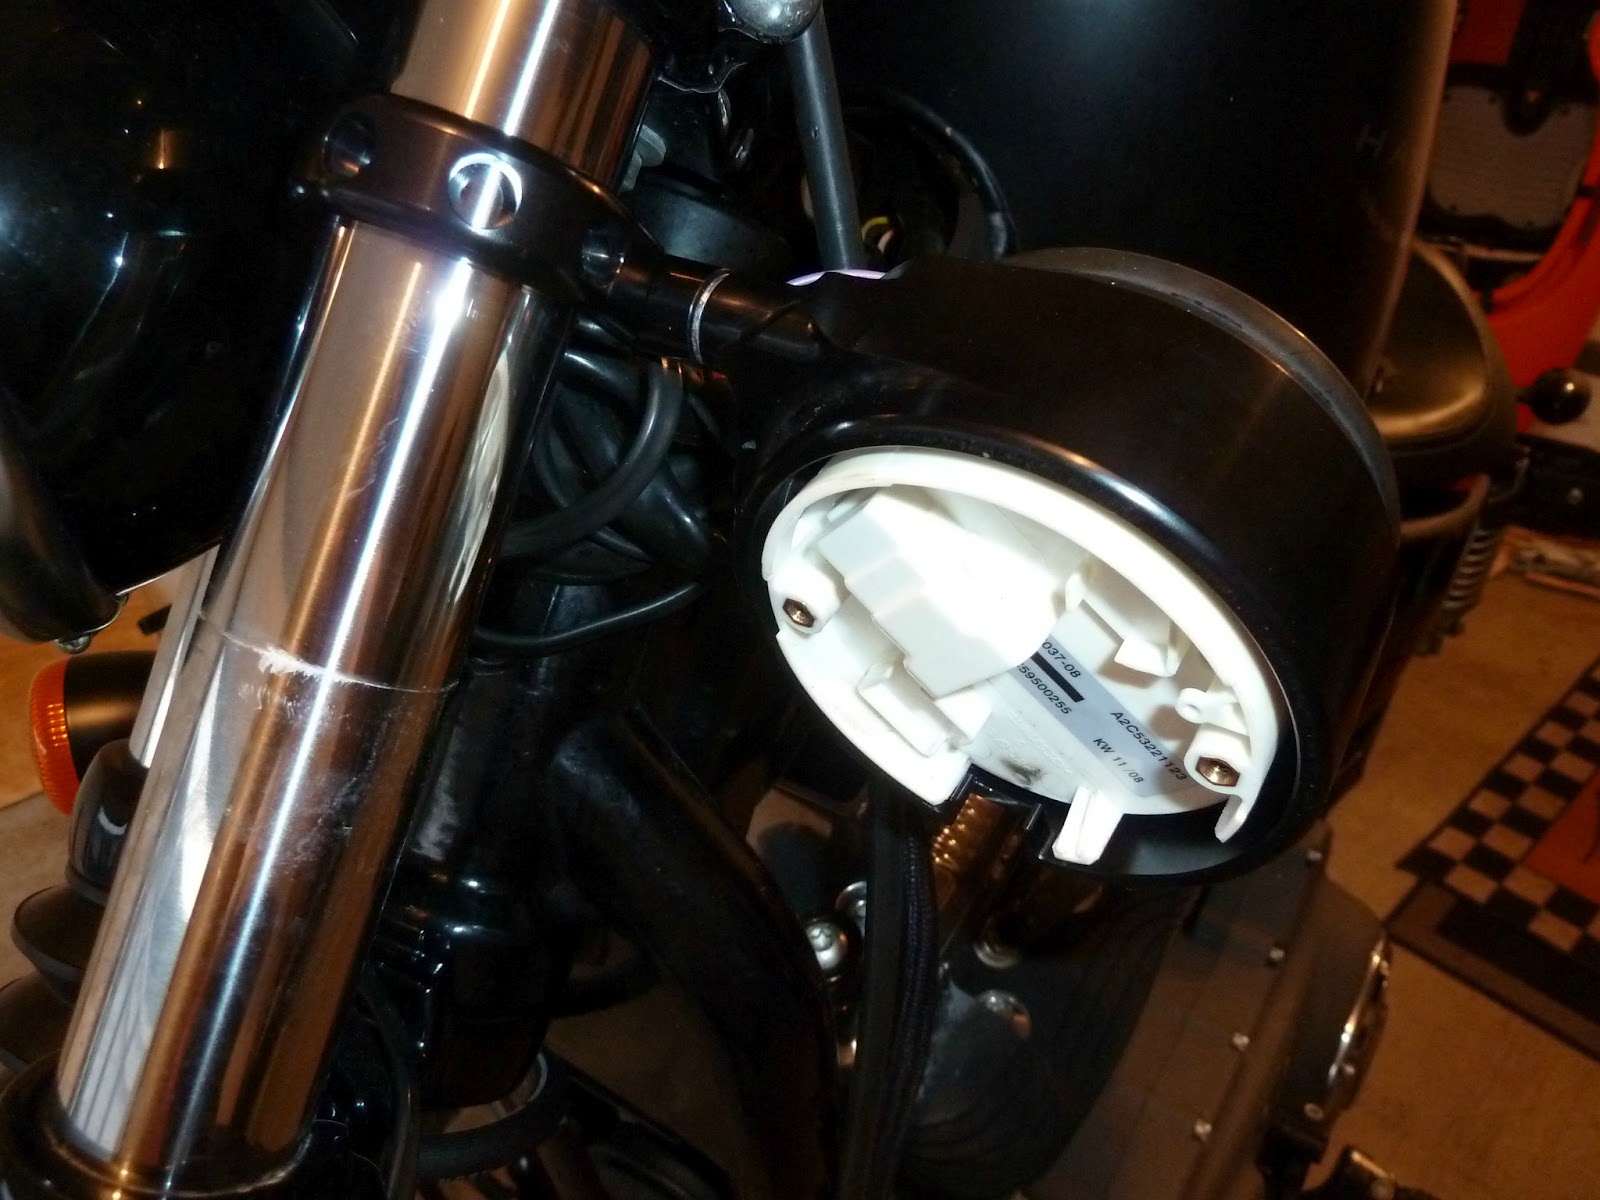
You need to get some slack in the speedo wiring so it can reach the new location. There's plenty wire, so no need to do any extension or splicing for this harness. To get some slack, take the two bolts out of the headlight mount and swing the headlight out of the way for access. Then carefully slit the rubber shroud* holding the wiring harnesses together. (*See the pic immediately below..I'm pointing to the shroud.) I made a cut about 4" long to get room to pull the wiring down and to the side so I could reattach it. The second pic, just below, shows the cut I made.
NOTE: In this step, I'm referring only to the wiring that we just disconnected from the speedometer, and not the bundle connected to the LEDs in the top clamp.
Pull the speedo wiring down and over to the new location, making sure there's enough slack to move the fork side to side without pulling on the harness. Leave the LED wiring alone for now.


Next assemble the speedometer into the Joker mount. Snug the clamp into position, rotate the gauge so it's oriented to your liking, and then mark the location with a pencil. Why the mark? I found assembly in the normal position to be a first-class pain in the ass, so after marking the location (and before throwing tools across the garage!), I turned it all upside down to put the thing back together. I lined up my marks, installed that rubber retainer, the wiring connections, the reset button, and finally the two small screws...WITH BLUE LOCTITE! Then loosen, rotate it back down, and snug it up again.
And I'll mention that once the rubber retainer is installed, you ain't gonna rotate the speedo in the mount, so get it in the correct position before installing the rubber retainer/seal.

Burp!
OK, let's finish up this project. Next I installed the new risers, which is simple enough. I'll mention that I should have touched up the shiny bands on the bars with some flat black paint before mounting. The risers don't cover them up. Ask me how I know.
Don't fully tighten the riser mounting bolts until after you clamp the handlebars in place. Clamping the bars helps line the risers up, so tighten the top clamps first, and then finish tightening the riser bolts.


Risers on and bars remounted...Now the fun part.
Now, ever so carefully, I began splicing the leads from the Joker mount LEDs into the harness. The leads are staggered in length so you don't wind up with a nasty lump of splices all in one spot. I first pulled the longest lead through, grabbed the corresponding color from the harness, snipped it, stripped it, and crimped it onto the LED lead. Use the mount instruction sheet to match up the right colors. Then I grabbed the next longest, and did the deal again.
Repeat until you splice 'em all and wrap up the wiring bundle with corrugated wire loom and secure it with black wire ties for a neat looking job. I combined the LED leads with the speedo wiring in one loom. Even mine looked OK!


Fini
That's about it. Reinstall the headlight, fender, front wheel, and caliper, all using Blue Loctite. Hook the battery back up and turn on the ignition. Now you can test all the LEDs and speedometer indicators.
Untie the straps and set 'er down. Right about here, I was asking myself how I EVER got by all those years without a good motorcycle lift. Actually, I didn't even have a cheap one, unless you count the milk crates.
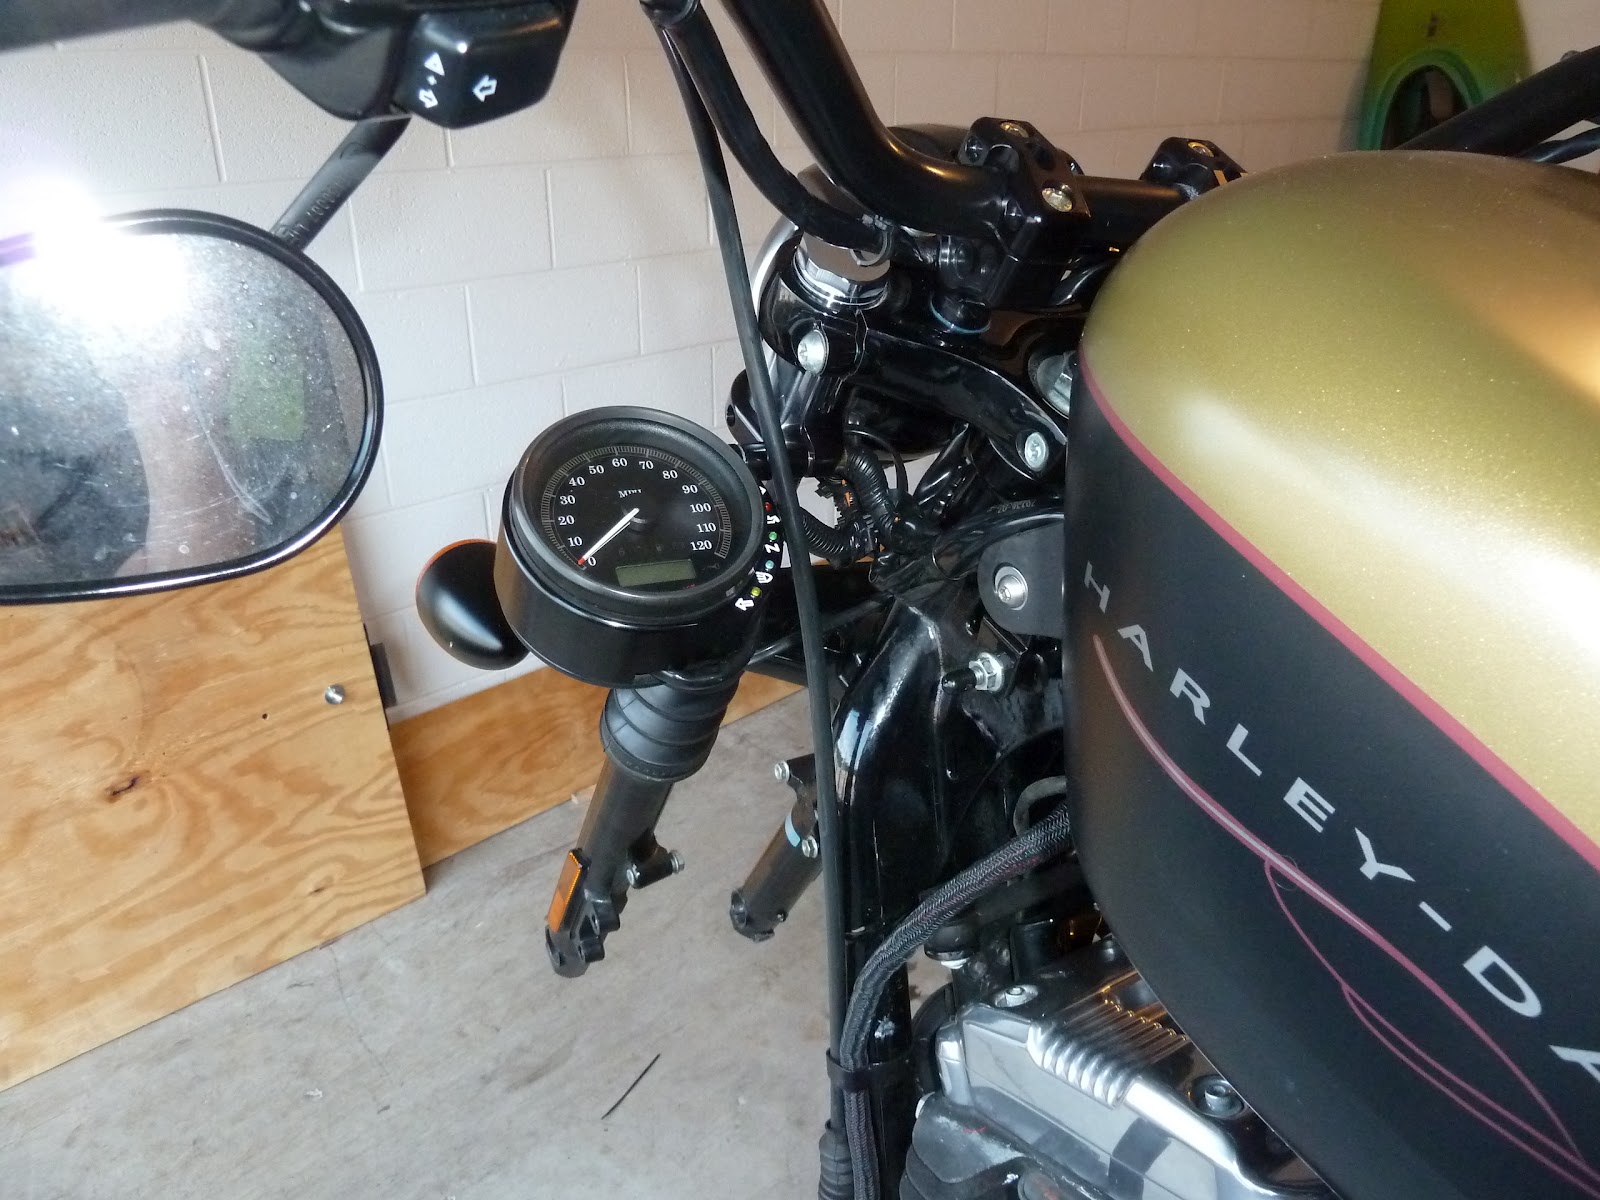
Now crank it up and ride to check speedometer operation, and of course take note of the cool new location, not to mention the clean, flat-tracker look of that front fork. I was VERY happy with mine, and the location still makes the speedo easy to read, plus the LEDs are easy to see. Another job well done!

Yeah, those bright-fucking-orange turn signals gotta go. I put smoked lenses on, which look much better, but I might just take 'em off completely.


Nice and clean...gives it a racing-bike look, with no clutter above the handlebars.
OK, stay tuned for the next installment. Air cleaner and whatever else I can find, but there's actually not much more I wanna do right now, figuring I'll get some riding out of the Joker before tearing it apart again.
Cowboy
PS Here are the links to all 6 Nightster/Joker posts in order, 1-6:
http://cowboyken.blogspot.com/2011/05/nightster-projectbeginnings.html
http://cowboyken.blogspot.com/2011/05/nightster-projectbeginnings.html
http://cowboyken.blogspot.com/2011/10/canyon-carvers-real-story-aka-joker.html
http://cowboyken.blogspot.com/2013/12/good-times-and-good-memories.html
http://cowboyken.blogspot.com/2013/12/good-times-and-good-memories.html
im more interested in that whale tail 911 turbo you got there. :) nice looking nightster btw. loving that copper black two tone.
ReplyDeleteBeen trying to see off the Porsche for a while, maybe paying some bills, but more likely to build another bike or buy an Ultra Classic! Trouble is, I can't find anyone that wants to write the check (and I really don't try to hard to sell it)!
ReplyDeleteAfter I shine it up and take it for a ride, I get this big stupid smile on my face and carefully put in back in my garage, no longer sure I want to see it go. Great car for dates and just cruising around when I'm not riding.
The copper and black FSXTC is a sweet ride. Most comfortable bike, ever, and it's great for long rides. Being an 105th Anniversary bike, I don't change anything on it, hence the purchase of the Nightster which I don't feel bad about customizing.
Thanks for the kind words!
Cowboy!
Hey dude, really well presented blog, you just sold me and i orderd a Joker speedo mount. I was perplexed to the old mount ie how the speedo popped out, I have seen some helish jobs where bozos have cut the bracket and u-bolted it to the frame, ugly just ugly...
ReplyDeleteOnce again great block easy to follow, i will be coming back.
take Care
JimmyIron Brazil
Hey JimmyIron Brazil! Go for it, Bro, and glad the blog helped out. Let me know how it goes!
ReplyDeleteCowboy
Cowboy,
ReplyDeleteI would like to get on my soap box and rant a little about something simular to the Big Mac economy markers, you know you can guage how much taxes etc a country has by the price of its local Big Mac. Lets do the Iron883--- All converted to USD
USA- $7999
Canada- $8679
South Africa $10,159
Britain- $10,668
Germany- $11,132
France - $11,509
India - $14,103
Brasil - $16,298 (Expensive eh?)
How can HD allow this, all the parts are shipped to Brasil from the USA and the bikes built and 120% added.
Each time I go to a Harley dealer in the states I want to buy a bike but we cant take them back.
So just think of us in Brasil next time you look at a price of a Bike.
Thanks I feel better now
JimmyIron
Damn, Bro, that's a harsh deal. Seems like HD should take better care of a big market like Brasil ! WTF?
ReplyDeleteHey, maybe I could ride one down every month or so, sell it, and fly back. Repeat as necessary......
Cowboy
Hi,
DeleteGreat work done by author. I appreciate it. Thanks for sharing this informative post. Keep posting updates.
Thanks for the nice words, Bro.
DeleteRide safe
Cowboy